
Welcome to part 2 of my little network masterclass.
In this episode I shall show you how to stress test your network to the max. We’re going to try to get those wires to burst, spilling data all over the carpet.
Why would we want to do such a destructive thing? Well, we want our networks to run as fast and as reliably as they can, and we can’t know what the limits of speed and reliability are unless we really push our networks to the max. From this we will be able to work out ways to make the network better, faster, stronger…
So what sort of things are we going to be looking at? Well, here’s a brief summary:
Network Throughput
- Just how much data can we push through those wires at once without it breaking?
Packet Sizes
- What happens if we use lots of small packets, or some really really huge ones?
Advanced Routing
- Trip over a wire and pull it out of the wall – could cripple your network. But, could it go unnoticed..?
Preliminaries
First off I’d like to introduce you to the tools we’ll be using during this testing. Meet my little friend mtr, or “My Trace Route”. No, it’s not actually mine! That’s its name! Honest!
mtr performs the same job as normal traceroute, but does it oh so much better. Instead of just tracing the route once, it does it over and over and over and over until you tell it not to. It’s great for monitoring a network path while we do things to it.
mtr can be installed on most Linux systems with one of these:
# apt-get install mtror
# yum install mtr(your Linux system may be slightly different, or may expect a slightly different package name)
Now let’s make us a nice network to play with. In this my network is actually going to be a collection of virtual machines, but it will be just the same as if we were playing with a real network.
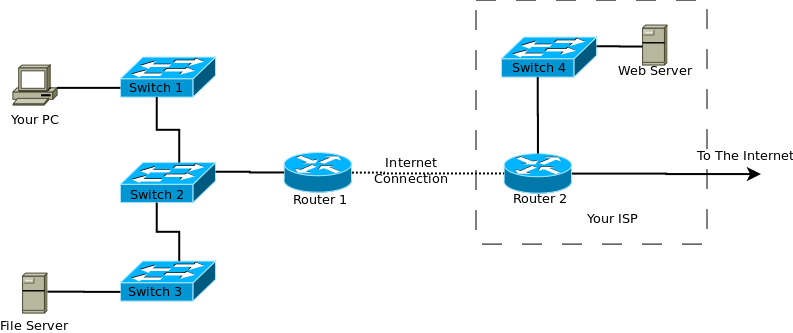
How’s this for a network?
There’s nothing out of the ordinary here. Your PC connects to a switch in your office (Switch 1). This in turn connects to a switch in the communications room (Switch 2) where the router that connects you to the Internet is (Router 1). That switch then goes on to a third switch in the downstairs office (Switch 3) where there is a file server. Your web server is hosted at your ISP (router 2) and the rest of the Internet leads on from there.
Pretty run of the mill stuff. Let’s assign some IP addresses:
- Your PC: 192.168.1.55/24
- File Server: 192.168.1.254/24
- Router 1: 192.168.1.1/24 (internal); 172.16.194.37/30 (Internet)
- Router 2: 172.16.73.145/30 (internal); 172.16.194.38/30 (Internet)
- Web Server: 172.16.73.146/30
Note how the two routers have two IP addresses – the one on their LAN and the one on the Internet connection.
I really must get a more reliable ISP.
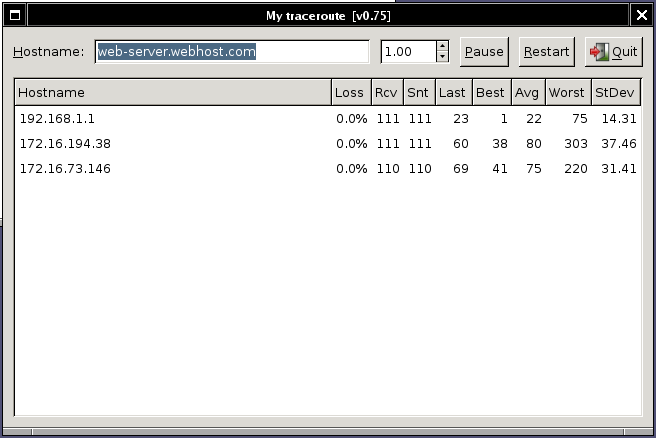
So this is MTR running on Your-PC checking the link to Web-Server:
You can see the three machines – router 1, router 2 and the web server. Notice that the switches don’t appear – they are invisible to IP traffic. All is well with this network – all the packets we are sending out are being returned to us. There is no problem.
But what if we introduce a bit of a fault? Maybe a little bit of packet-loss somewhere along the line? Well, that’s easy enough to do on my VM based test-rig. So let’s do it. I’m not going to tell you where the packet-loss is. Not yet, anyway.
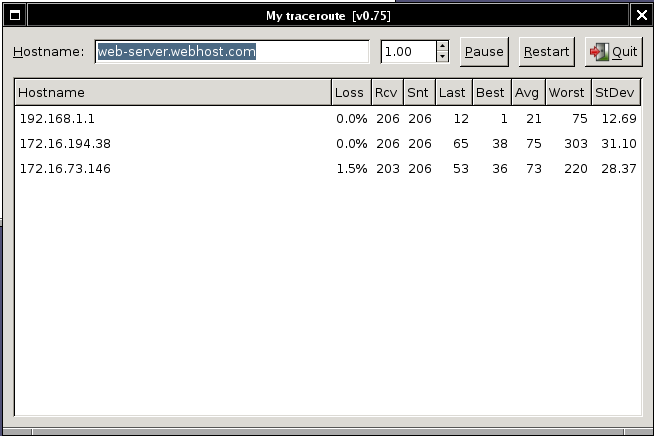
Here’s how MTR looks now:
You see the packet loss? 1.5% isn’t much, but it’s enough to be annoying. It shows that there is obviously something up with the network.
Now, you’d expect the packet loss to be between 192.16.194.38 and 172.16.73.146 (that’s router-2 and web-server), wouldn’t you? Well, let’s just confirm that shall we.
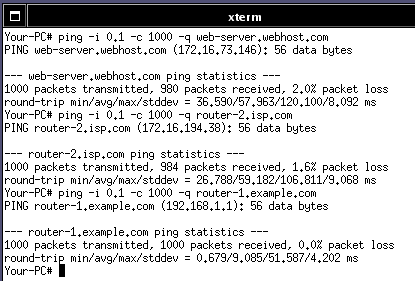
This is where some advanced usage of the ping command comes in. We’re going to use the -i flag to ping, which sets the ping interval, along with the -c flag to set the number of pings. Also, to keep things tidy, let’s throw in the -q flag to stop telling us about every single ping.
So let’s ping each host in turn, starting from the web-server and working backwards towards us. We’ll send 1,000 pings at a 0.1 second interval. That should take between a minute and a half and 2 minutes (approx 100 seconds) to run each one:
So, what do we see here? Well, we see that pinging the web server unsurprisingly gives us 2% packet loss. But also, pinging router-2 also gives us 1.6% packet loss. Pinging router-1 gives us no packet loss whatsoever. So it looks like the packet loss isn’t between router 2 and the web server – it is in fact between the two routers. So why did MTR tell us otherwise? Well, that’s simple. MTR can only tell us when a packet doesn’t reach its destination, and with so few packets being lost it’s hard for it to get a good idea of exactly where the packets are being lost. If we’d left it running longer it would have shown us that there was packet loss to router-2 as well. Time to make a call to our ISP to get the problem resolved…
Curse that dratted cleaner!
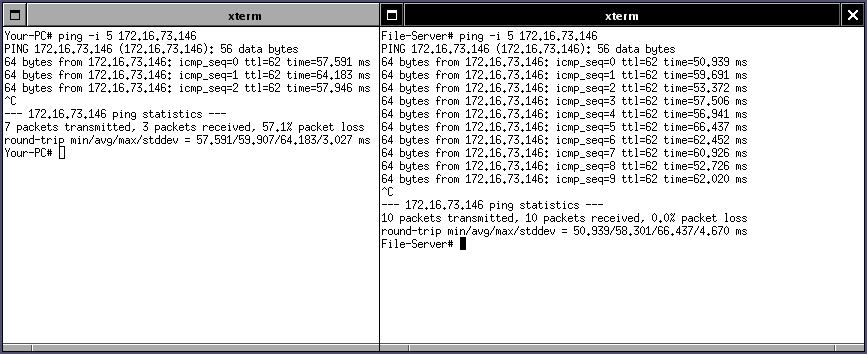
Ok, I have called the ISP and they have fixed the connection, but now it seems that someone has tripped over a network cable and pulled it out.
The left-hand ping is from Your-PC, and the right-hand one is from the File-Server. As you can see, the file server can quite happily ping the Web-Server without any trouble. Your-PC, however, has been suddenly and ruthlessly cut off after only 3 pings! What happened is the cable between switches 1 and 2 has been pulled out, chopping the network in half. When the cleaner tripped over the cable it ripped the plug off the end, so it’s going to take a while to get it fixed. The boss will be in a bit of a state over this – half the company unable to work! So how could this have been avoided?
Well, the obvious answer is don’t let the cleaner near the network cables 😉 But there is a way to stop this from ever happening again.
Thanks to a wonderful system called the Spanning Tree Protocol, it is possible to add an extra link into the network. Run a wire between switches 1 and 3. That makes your main inter-switch network into a nice ring.
However – if the switches aren’t intelligent enough they may well start sending packets right round that ring – over and over and over again. Your network could end up in a right state. Fortunately, my 3 switches all happily support this Spanning Tree Protocol, so they should be able to work out which packet should go where.
So let’s add that cable into the test network now, shall we?
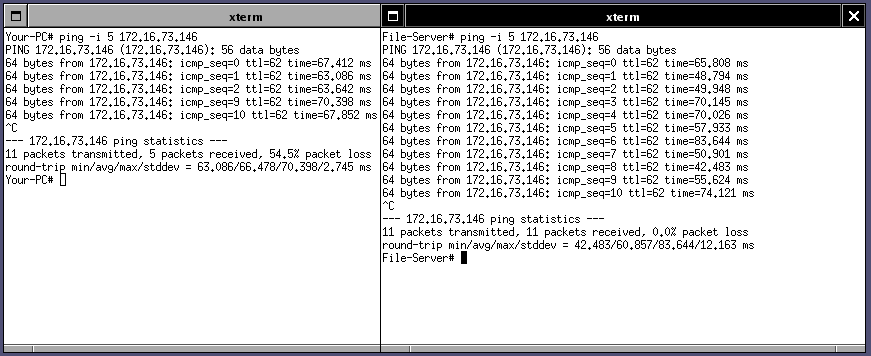
Oh no, that dratted cleaner – I really must move that cable!
Same cleaner, same cable! However, this time notice how a few packets got dropped, but then it magically healed itself and carrie don working! The switches, using the Spanning Tree Protocol, have decided that although there is no link between switces 1 and two, there is an alternative route that goes via switch 3 – so they they start using it! When the cable gets replaced (again!) between switches 1 and 2 the packets will switch back to that cable, because it is a more efficient route. The same applies to the link between switches 2 and 3, and even between 1 and 3. It’s now fully redundant!
There is more, and better, to come yet.
You have seen wondrous things in this post with advanced networking, and it has all been done from the comfort of my arm chair using Virtual Machines. In my next blog post I will show you some of the clever things you can do with VM Networking.
Filed under Networking

Subscribe to comments with RSS.
Comments have been closed for this post