VLC Media Player is one of the most versatile media players out there when it comes to playing back audio and video. The list of supported formats is quite long and covers just about anything you can find on the Internet. VLC is also cross-platform, so it doesn’t matter what OS you’re using – there’s something for everyone.
However, VLC is capable of far more than just playing back your music and video collection. It can also stream content to other computers and transcode (convert) files to a number of different formats. It also has a remote interface that allows you to control it from any Internet-connected device.
Note: although VLC has a full command line interface, we will only be using the graphical interface.
Streaming Content
In order to stream content from VLC, you will need to ensure that your equipment is up to the task. This includes making sure that:
- you have enough bandwidth for each of the clients that will be connecting
- if your PC is behind a router, you need to make sure that the router supports port forwarding and NAT (Network Address Translation)
- if you’re transcoding the content before delivering it, you’ll want to make sure that your PC has the processing power to do that
VLC is capable of streaming content from a number of sources, including audio / video capture boards, webcams / microphones, and even the desktop itself.
The first step in setting up a stream is to launch VLC and open the content you want to stream. For example, to stream content from your webcam on Windows, you would go to “Media->Open Capture Device” and (assuming “DirectShow” is selected under “Capture Mode”) select your webcam:
Once you have selected the input source for the stream, click the down arrow next to the “Play” button and select “Stream.”
You will then be presented with the “Stream Output” dialog which allows you to specify the settings that will be used to stream the content. Since we already have the source, we can simply click “Next” to move on the next step.
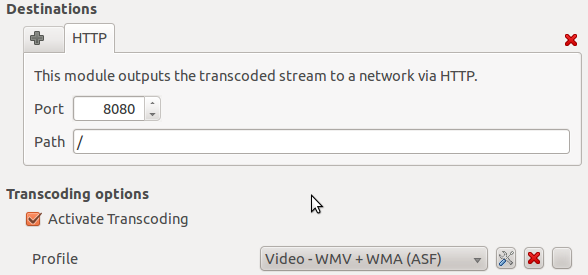
For this example, we will create an HTTP stream that can be viewed on any device that supports WMV playback. In order to do this, we will perform the following steps:
- under “New Destination” we will select “HTTP” and click “Add” (if you want to also display the content locally on your machine, select “Display Locally”)
- under the “HTTP” tab, we specify a port to use for making our content available to others – this can simply be left at its default setting as well as “Path”
- to transcode our source to WMV format, we will need to select the “Video – WMV + WMA (ASF)” profile
- if you want to change the bitrate or scale the video, simply click the “Edit Selected Profile” button (the wrench icon next to the drop-down)
Here’s what it should look like:
At this point, we have everything all set up to perform the transcoding and stream the content. Simply click “Stream” and you’re done!
Viewing the stream on a PC, for example, is as simple as launching Windows Media Player, and opening the stream’s URL, which is of the format: http://ip-address:port. (In our example, we could view it locally by using http://127.0.0.1:8080.)
I mentioned earlier that you need to have a router that supports port forwarding if you’re going to be viewing the stream from a device that’s not on the local network. The reason for this is simple – the computer providing the stream is assigned its own internal IP address for the newtork by the router and consequently is inaccessible from the outside world. Port forwarding instructs the router to forward incomming connections on a given port to the specified computer. In our example, this would mean forwarding port 8080 to the machine running VLC.
Filed under Software


Subscribe to comments with RSS.
Comments have been closed for this post