I have often had to answer questions on setting up advanced networking with VirtualBox. The most common ones are along the lines of:
Connecting to a VirtualBox machine from the host, using an ip address
and others of a similar ilk.
Well, let’s delve into the mysteries of VirtualBox’s networking (and networking in general) to unravel the secrets behind setting it all up right.
VirtualBox has 4 basic types of network available:
Internal Network
This is a special virtual network which is only able to communicate between guest operating systems within the same VirtualBox installation. It is ideal for setting up virtual networks for testing out advanced routing without the worry of interfering with your real network.
NAT
This shares your computer’s IP address to give your virtual machine access to the rest of the network, and to the internet. It basically allows your virtual machine access to pretty much anything that your real computer can access. It doesn’t allow anything to access your virtual machine, however. It’s a one-way ticket. Your virtual machine has access to the outside world, but the outside world can’t get it. Not very good if you want to run a web server or something on your virtual machine, but ideal if you just want to do web browsing and such.
Host Only
This is similar to the Internal Network but the host computer is included in the network. It is possible to get this mode to access the rest of the network if you know how, and I will be showing you how a little later.
Bridged Networking
This is the most open mode of networking available to VirtualBox. It connects to your raw network card and uses it as if it were directly attached to the network. As far as the rest of the network is concerned your virtual machine is just another computer on the network. It’s completely open and any services you run on the guest will be available to the rest of the network – and to the internet if you set up port forwarding on your router.
So that’s the 4 types of network. In the majority of cases Bridged Mode or NAT will do what you want, and are very very easy to set up and need little or no configuration.
But what if you want the flexibility of the Bridged Network but with a little more control? Say you want to impose some firewall restrictions onto your guest OS but you don’t (or can’t) do it in the guest itself? Well, that’s where Host Only with a little bit of networking magic comes in.
Host Only with Network Routing
The Host Only networking operates just like any other network. It adds an extra network device to your computer (in Linux this is vboxnet0) and can be treated just as if it were another ethernet card.
There are two basic things you need to do in order to allow Host Only networking access to the rest of the world:
- Allow traffic to flow through your computer to the virtual machines
- Tell the rest of the world that the Host Only network exists
Now, I can’t tell you how to do this – the exact details are dependent on your host operating system and the other hardware on your network. Different makes & vendors have different ideas about how it should be done. I can, however, show you what to look for and how to know what you should do when you find it.
Allowing traffic through your computer
This is often known as IP Forwarding and in most operating systems is turned off by default. On most Linux systems it can be turned on by editing the file /etc/sysctl.conf and adding this line:
net.ipv4.ip_forward=1That will set the forwarding ready for the next reboot but won’t turn it on right away. In order to do that issue this command as root:
# sysctl -w net.ipv4.ip_forward=1In FreeBSD it’s a case of adding the following to /etc/rc.conf:
gateway_enable="YES"then issuing as root:
# sysctl -w net.inet.ip.forwarding=1(note how it differs to Linux slightly)
Ok, so that’s the easy bit. Now comes the tricky part…
Telling the rest of the world about your Host Only network
Ok, so maybe that’s a little exaggeration on my part – you don’t really need to tell the whole world about the network – only one little part of it. That part is your router (or default gateway). All traffic on your network for places that aren’t on your network will pass through your router to get out onto the internet. So, if your router knows that the host only network is actually on your computer, then any traffic it gets for that network it can send on to your computer instead of out onto the internet.
The Host Only network will have been given its own IP address range automatically by VirtualBox. Mine is 192.168.56.0/24 (that’s 192.168.0.56.0 with a netmask of 255.255.255.0), the host computer being 192.168.56.1.
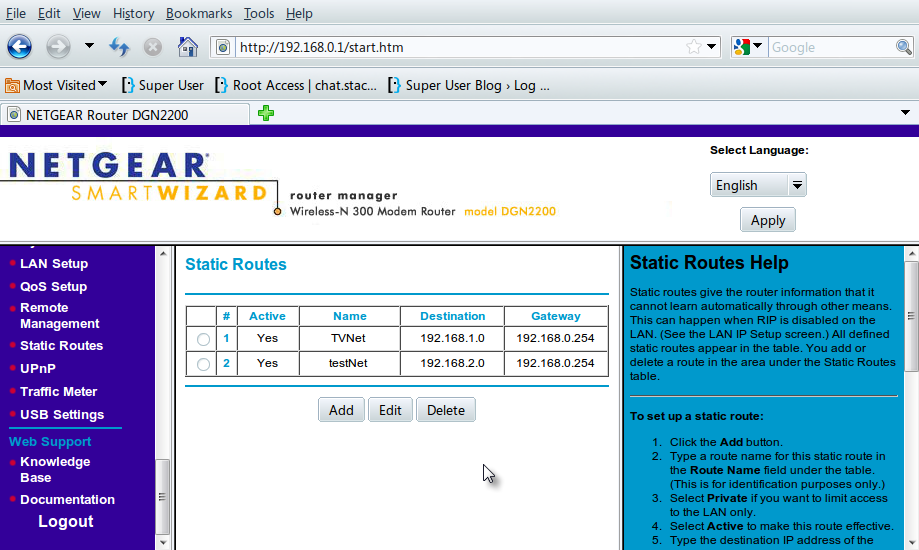
Logging on to your router through the normal method (usually that’s a web browser these days) you want to look for a section where you can set up Static Routing or the Routing Table. On my Netgear router it looks like this:
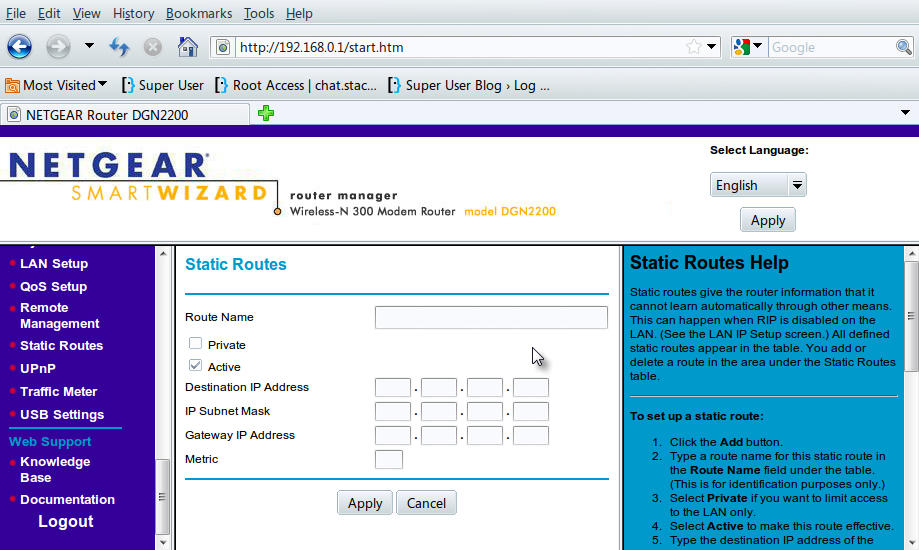
Then you need to add a static route to the list of routes. Again, on my Netgear, this is what you get:
Your system will more than likely look different but contain the same information. What you need to fill in here is:
Route name: Whatever you want to name your route Destination IP address: This is the IP address range of your Host Only network – on mine it is 192.168.56.0 IP Subnet Mask: The network mask of your Host Only network – 255.255.255.0 in my example. Gateway IP Address: This is the IP address of your host computer. It tells the router where to send the data for the Host Only network to. Metric: It doesn’t really matter what goes in here. I usually put 1 or 2. It only matters when you have multiple routes to the same location.
Your system may not have a Route Name or a Metric section, but the three middle entries are guaranteed to be there in some form or other.
Hit the apply (or save) button and voila, your network should be working. Your router may need to reboot before it can activate the changes, but other than that it should all be working.
There is only one other thing to take note of – the default gateway in the guest operating system. This should be set to the IP address of the host’s end of the Host Only network (192.168.56.1 in my case).
You can test it by trying to ping the router from inside the guest operating system, and trying to ping the guest operating system from another computer on your network. If it’s not working it is likely to be the firewall settings on your host computer.
You are in a position to adjust the firewall on your host computer to lock down access to the guest operating system in just the way you want.
Filed under Networking Question of the Week Virtualization


Or just run
sysctl -pto reread the configuration file.Awesome, thanks for posting this up! Solved so many problems for me, just discovering what bridging is, exactly what I have been after!
Really need help in my case to be able to communicate VIRTUAL MACHINE 1.2 to 2.1
HOST 1 (Win 7) VIRTUAL 1.1 (Linux Oracle) VIRTUAL 1.2 (Linux CentOS)
HOST 2 (Win 7) VIRTUAL 2.1 (Linux Ubuntu) VIRTUAL 2.2 (Linux Oracle)
If i want to conect two virtual routers in virtual box which type of network i can use, and how i can configure this network?